Nutty English Toffee

A little nutty

A little sweet

Just like me

Well, ok, I might be a little nuttier…

So, here we are again with another candy-making recipe. I apologize for not posting sooner as promised. If you have children, a spouse, a job, and 3 sets of families vying for your time and attention right before Christmas, you will understand. If you don’t, just make the toffee, eat it, and you will never again be upset in your entire life. Promise.

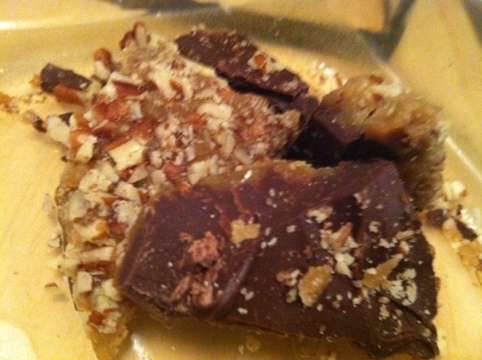
Toffee – Stand alone, it is probably my most favorite candy on all of the Earth. I love the buttery flavor, the texture; how it’s not super hard but not soft; just somewhere in between. Add a layer of chocolate and nuts, and you will think you have died and gone to Heaven.

So go put the kids to bed (I’m assuming here that you’re like me and don’t do any “me” related stuff until the clock strikes 9pm), turn on an old episode of The Office (one that you have seen so you don’t have to pay attention to plot lines, but can laugh a lot) and mentally prepare yourself, because you will end up eating most of it.

Ingredients

** note the BEAUTIFUL and professional photos (my husband was home when I decided to embark on this adventure, it pays to have a super talented and hot photographer husband)

Candy Thermometer

1 lb Butter (I used Salted but I have read some recipes that say not to. You decide)

1 lb Sugar (I tried this with brown sugar and the consistency was not quite right, still tasty though)

1 cup Semi-Sweet chips

1/2 -1 cup chopped nuts (I used pecans because I had them but any will do. Get creative)

1 tsp Vanilla Extract

Directions

Generously grease an extra-large (or two medium) cookie sheet(s) with butter (please use butter and not something that you spray out of a can. That stuff scares the bejesus outta me). Oh and please warm up your coffee that you have been attempting to drink all day and drink it now.

Chop your nuts. Laugh at yourself for the silly thoughts that just ran through your head and move on.

I used a knife and chopped the pecans by hand instead of using a food processor. For some reason every time I use the food processor I end up with some “nut dust”. I didn’t want “nut dust”….

You get the point…

Moving on….

Spread the chopped nuts in an even layer over the cookie sheet (or sheets if you opted for two medium ones) and set it off to the side

Cut your pound of butter (4 sticks) into sections and dump it, along with the pound of sugar into a large pot.

Yes, when stated like this, it kind of seems like toffee may not be that good for you. Please ignore all of this butter and sugar, we are making toffee for Petes sake….any apprehension you feel will quickly diminish after your first bite…

Insert your candy thermometer into the pot and clip it onto the side. Make sure that the thermometer is not touching the bottom of the pot, but rather just resting in the liquid.

Bring the butter and sugar to a slow, rolling boil over medium heat. Patience….

Boil over medium heat stirring constantly until the mixture reaches between 295 and 300 degrees on the thermometer.

As soon as it hits that temp, stop stirring and let it boil to 305 degrees.

The concoction should be about the color of caramel, or a little lighter. Here is where I missed the picture of what the toffee should look like…imagine the color that your vanilla ice cream turns to when you mix it with caramel and it has been sitting for a while. But thicker. That’s about the best I could do…

Immediately remove the boiling butter and sugar from the heat and pour in the tsp of vanilla. Please have this already measured out…time is of the essence here.

Pour the liquid toffee mixture into your pre-greased cookie sheet(s) spreading the mixture evenly with your trusty rubber spatula. Let it sit for a few minutes and then sprinkle the chocolate chips over the top. Please do not touch the toffee…this stuff takes a long time to cool down, I know because I touched it, and it hurt.

I love this picture because it shows what chocolate looks like when it is melty (that point where its spreadable); you know what it looks like but it’s just not something you can describe.

With your rubber spatula, (please tell me that you have one by now), spread the chocolate into an even layer over the toffee. Now when I say even layer, I mean get the chocolate over as much of the toffee as possible. Do not spend hours making it perfect. It will not taste any different. Promise.

As you can see above, mine was by no means perfectly spread and not one person told me that their toffee did not have equal parts toffee, chocolate and nuts. PS if anyone does notice that and calls you out on it, please take the candy away from them and give it to a more appreciative recipient.

From here, I put mine in the fridge for a bit, then in the freezer for a few hours to speed up the hardening of the chocolate. It depends what kind of combination of patience and self-discipline that you have. I have none. Hence the freezer.

When the chocolate has completely set and hardened, take it out, turn it upside down onto the counter or a cutting board and give it a few whacks with the side of a wooden spoon.

Please eat about 5 or 6 pieces and tell yourself that you will start dieting as soon as the holidays are over. Store the rest in an air tight container to eat at a later time, or if you can part with it, put some in a cellophane bag, wrap a pretty ribbon around it and give it to your neighbor as a gift.

Now, go sit down with a glass of wine (and maybe some more toffee) and relax. You deserve it!

Toffee Teaser


20111221-225228.jpg

Yes I made it

No it is not quite ready for you yet
The texture and consistency just weren’t quite right

That doesn’t mean it wasn’t delicious and that I didn’t eat about half the pan
But hey you can wait one more day right…

Ok if you can’t….please go get a Heath Bar and indulge your needs. Just know it tastes so much better when your hands were the ones that created it

Check back tomorrow 🙂


Black and White Peppermint Bark

There are three things that I am sure of:

1) I don’t eat bark (why is it called bark? Did it at one point resemble the bark on a tree? Was it named  after some old lady’s dog? Someone please tell me…)

2) I don’t like peppermint

2) I love this candy

That said, I am not sure what truly inspired me to make anything I might not actually eat this year, other than I thought it would look pretty, and well, other people seem to like it.

I did like it though, in fact I kind of loved it.

Imagine biting into a cold, snowy day when you don’t have to go to work (or school) and all your worries have been swept away. Now that is what you have to look forward to. No worries.

My version of this goodness does not require a ton of ingredients, although it might not be the stuff you have in the back of the pantry from your last baking adventure, so you may need to make a quick trip to the store (and please don’t go to the grocery store, find a Target or Wal-Mart, it will cost sooooo much less)

It is also not a difficult process, just time consuming really (candy making = time consuming)

So get get ready, turn on a Veggie Tales for the kids, put on your apron (please tell me you have one) and get to it!

The Team

* are you proud, there is a picture this time 🙂

24 oz White Chocolate

12 oz Semi-Sweet or Dark Chocolate

6 or 7 Candy Canes

1/2 tsp Peppermint Extract

Sea Salt

The Game Plan

Preheat the oven to 225

Unwrap and break up the candy canes into smaller pieces

Get out your food processor and chop those babies into itty bitty pieces (if you don’t have a food processor, put that on the list of things you will be buying at Target or Wal-Mart, in the mean time, wrap the candy canes in a paper towel and beat them with a meat tenderizer, or anything hard really)

Line a 9×13 baking dish with a piece of foil and spread the semi-sweet chips out in an even layer. You will not completely cover the foil, just make sure that they are not piled on top of one another

Put the dish into the preheated oven for just about 5 minutes

When your timer buzzes take the dish out of the oven, and please put on your oven mitts or this candy making process will have to be traded in for a trip to the emergency room.

Smooth the gooey chips into an even layer with your best friend, the rubber spatula, sprinkle with the sea salt and place the dish into the fridge for about 20 minutes

Now here is an important part of the recipe. You have 20 minutes of freedom (as long as your freedom has not been detected). Go grab a book, sit on the kitchen floor (unless your floor looks like mine right now, then don’t, feel free to use a chair) and read. By all means if you don’t like to read, go do some dishes, play a game of words with friends, or maybe do some blogging 😉

Ok, I think your 20 minutes are up

Take the dish out of the fridge and put it in the freezer. You want to make sure that the chocolate is as cold as possible so that the heat from dumping the white chocolate in does not melt it

Go get your double boiler (unless you are like me and do not own one, then get a pot, a steaming basket or small colander and a bowl…please make sure all of these are metal or glass, we don’t want you melting anything but chocolate today)

Place water in the pot and set it on high to boil (do not fill the pot so high that water will directly touch the steaming basket or bowl)

Dump the white chocolate into the bowl and set it in the double boiler

Stir the chocolate around with your rubber spatula

When it has completely melted through, pour in half of your candy cane dust and the peppermint extract. Please make sure to also spill it all over your hand so you smell like a fresh winter day just like I did.

I think I could be a hand model

Pour the melted white chocolatey pepperminty goodness on top of the semi-sweet layer, which you so diligently have already gotten out of the freezer and placed right next to your double boiler. Good for you! Way to be prepared!

Smooth the white chocolate into an even layer, sprinkle on the remaining candy cane dust and place the dish back into the freezer

After about an hour or 2, the chocolate should be hard and ready to break apart

Here is the fun part

Take a large cutting board and place it over the top of the dish

Flip the dish upside down so that the entire sheet of hard Peppermint Bark lands face down (dark chocolate side up) onto the cutting board

Grab a wooden spoon and get to whacking that bark into pieces (leave the foil on so that you don’t end up shooting candy cane bits at your dog)

Easy now, don’t get crazy. Those pieces shouldn’t be too small, just small enough to spread out amongst the ones you love

Now you can either package these beauties up and give them out as gifts, or you could eat them all, clean up the mess and pretend like none of this ever happened. You decide.

Regardless, I hope you enjoy them!

Creamy Dreamy Fudge

Oh Fudge…It is creamy…like biting into a stick of butter…but not gross like biting into a stick of butter (please, imagine texture at this point and don’t go bite into a stick of butter).

It is dreamy…like biting into Timothy Olyphant….wait…no….don’t….nevermind…

Wait what were we talking about?

Fudge

Beautiful, delectable, melt-in-your-mouth goodness.

This is what you call a family recipe. I have no idea where it originated, but it was what my grandmother always made, and what my dad still makes, and what, as of two years ago, I make as well. Why then, you ask, am I sharing this top secret family recipe with you? Two reasons really, 1) this goodness should not be kept under lock and key and 2) I just don’t have the time to make it for all of you….

So prepare yourself; unbutton your pants (because you will eat at least half of the batch and those pants will be ready to pop open) and please find some time when your children are not running under your feet and the dog doesn’t need to go out and you are not trying to empty and reload the dishwasher and sort the laundry.

Time is the most important part of this recipe.

Have fun and please, love it as much as I do.

The Suspects

* Note, this is where I would generally put a picture of the ingredients, however, I forgot to take one. So please use your imagination.

4 1/2 cups sugar (make sure to use good quality sugar, not the store brand stuff, it just doesn’t come out as tasty)

1 stick salted butter (sectioned)

1 can evaporated milk

1 jar jet-puffed marshmallow creme

18 oz (1 1/2 bags) chips (semi sweet, dark, butterscotch etc.)

1 cup chopped nuts (optional)

The Modus Operandi

Grease a 9×13 baking dish and set aside.

In a large bowl, dump the chips and the marshmallow creme. Set aside. And please make sure to use your most obnoxiously colored bowl.

In a medium sauce pan, over medium heat, bring butter, sugar and evaporated milk to a slight boil (please be patient and do not turn the heat up higher than medium. Remember that whole “time is the most important part” part. It really is).

As soon as the mixture starts to bubble, set the timer for 11 minutes and stir constantly. This is the most important part!! Constant stirring. If you have weak arms, I apologize, think of this as a pre fudge eating workout. Or you could always have someone help you with this part.

When the 11 minutes of stirring heaven are finished, pour the hot saucy liquid into the chip/marshmallow, and please be careful. This was just boiling 2 seconds ago.

Stir until smooth.

Please make sure that you stir so vigorously that your picture (if you are taking one) is also slightly out of focus.

Now, with a rubber spatula (if you don’t have one, go buy one. It is the best invention ever) pour the fudge from the bowl into the pre-greased dish. At this point, the mixture should not be liquidy, more gooey.

Spread it around so that it is even.

Lick the spatula.

And then let it sit on the counter taunting you for 10 minutes.

Place it in the fridge for about an hour to let it set up. I know, an hour seems like a lifetime when you are waiting for the best fudge ever, but remember that time discussion we were having earlier….

Take it out and let it sit for another 5-10 minutes before cutting it, unless of course you are Hercules and then by all means, have at it.

Now, please pop some of that goodness in your mouth and realize that you have just experienced what I like to think of as a small dose of Heaven on Earth.

Enjoy!